| make your own clock |  |
kits $27-35 |
| in the news | contact us | includes all materials | |
| testimonials | scalability | principles |

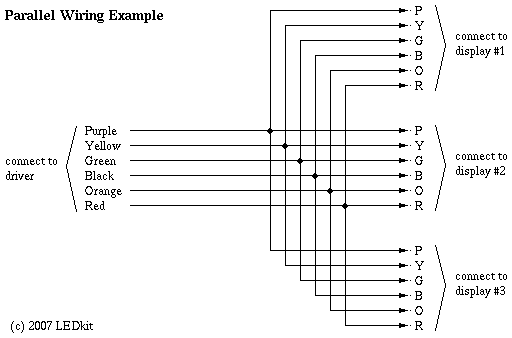
Multiple displays can be wired together to show the same time. It's easy (and the cables are inexpensive) because there are only six wires to connect! For example, connect three displays together using the following diagram:

You can either use a six-position terminal block which costs around $1 at most hardware stores, or just twist and tape the wires. Contrast this to expensive Ethernet displays that require $100 worth of expensive switches and cabling!
The LEDkit™ driver has a built-in current limit which safely reduces power output as displays are added. Nonetheless, if three or fewer displays are linked, then the low brightness setting will still yield 100 mcd per LED. This is less than the maximum output possible with a single display attached to a LEDkit™ driver, but still brighter than the maximum capability of most LEDs.
The kit can be special-ordered without the controller, or you can use your own LEDs to make the add-on displays. To achieve uniform brightness across displays, identical LEDs should be used in all branches. Therefore binned LEDs (as in B kit) are recommended.
Any 6-conductor cable can be used to extend the distance between the driver and the panel. If a branch runs over 40 feet long, then we recommended using a wire gauge that keeps total resistance per conductor under 2 ohms, with all branch resistances approximately matched.
For large multi-display installations please contact us for a custom quotation.
The included panel uses two parallel-wired LEDs to form each line segment. It is possible to build a larger display by connecting more LEDs in parallel for each segment. See photo.
Substitute an LED of a different color or style. Any LED with a starting voltage between 2V and 3.5V will work. For best results, do not mix different LEDs. To fit in the included panel, the LED must be size T-1. Otherwise the holes would have to be enlarged.
With a PC interface, you can use your clock as a general-purpose numerical display. For example, make a timer or a "now serving" counter, or even count email messages in your inbox.
A PC interface is not included, but you can make one out of standard components. Connect a LEDkit™ display to 6 I/O pins of any microcontroller. Amplification or attenuation resistors may be required, depending on the microcontroller current sourcing capabilities and desired brightness. For example, most microcontrollers have a limit of around 30mA per I/O. At 3V you will need around 200mA unless you insert series resistors. Then program the controller to receive commands from your PC.
| discover LEDkit | customize | what you get | get yours now |
| a big, fun project | make any face | clock features | a store near you |
| solderless | advanced mods | kit contents | kits $27-35 |
© 2007 LEDkit. All rights reserved. legal information | contact us